¶ Livegrade Studio Introduction
Livegrade Studio is a product of Pomfort GmbH, a Munich, Germany-based company known for its innovative software solutions for digital imaging and color grading in professional film and television production. Below are examples of recent films that have been color-tuned using Livegrade.
Its comprehensive capabilities enable filmmakers to fine-tune colors while shooting while also ensuring superior image quality. Define the desired look on set, immediately use it to automate dailies, and pass it on to post-production — saving time and enhancing the overall visual quality for the team. React quickly to scene changes required by the DP and make real-time grading with rapid iterations to achieve the desired look. With real-time responsive look adjustments and reference recordings, the team has enough information to evaluate creative decisions.
- About Livegrade Studio
- Virtual production workflows with Livegrade Studio
- Learn how to setup Livegrade Studio with NovaStar
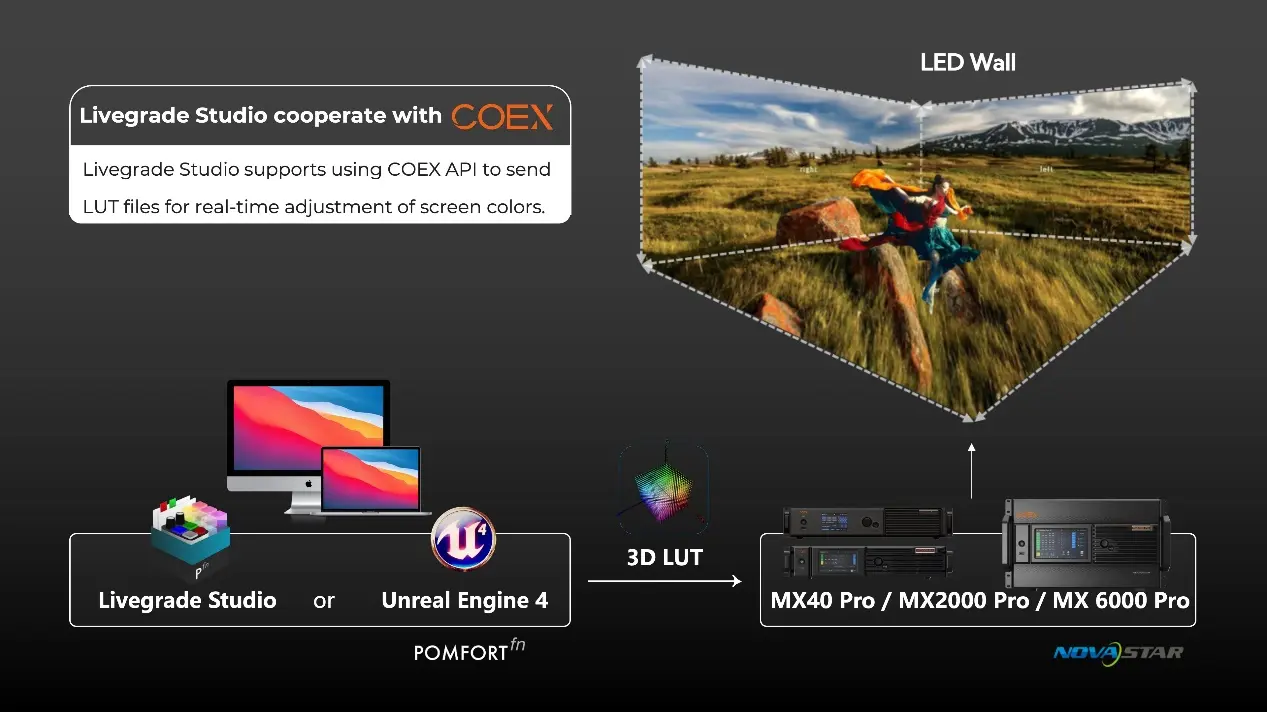
COEX's color grading can meet the regular application of LED screen, but colorists are more accustomed to using Livegrade, we meet their demands! COEX has already achieved full compatibility with the Livegrade color grading program.
Livegrade Studio now allows for interactive real-time grading by controlling the 3D LUT in the connected COEX processors. Basic CDL adjustments allow to perfectly match the foreground perfectly, and the content on the LED displays into a seamless result. If customers need more advanced color grading than COEX's existing color adjustment system, we can recommend they use the Livegrade.
Let's unlock a new era of visual splendor with Livegrade Studio and NovaStar!
¶ Livegrade with COEX Device Grading Principle
3D LUT is the basis of real-time grading between Livegrade and COEX. LUT (Lookup Table) is a kind of data table that stores the projection relationship between the input color and the output color, LUT file can realize the color correction and stylization effect by projecting the input color to the specific output color.
An API (Application Programming Interface) is a set of rules or protocols that enables software applications to communicate with each other to exchange data, features, and functionality. MX40 Pro/MX2000 Pro/MX6000 Pro realizes real-time color grading of the screen by using the API to send the 3D LUT for Livegrade Studio software, which sends many LUT files in a short time.
¶ How to Use Livegrade by COEX
¶ Software and Firmware
- Livegrade studio V_6.5.2 and above.
- VMP V_1.4.0 MAC and above.
- MX40 Pro V_ 1.4.0 and above.
- MX6000_2000 Pro V1.4.0 and above.
Due to the adjustment of the feature set of the Livegrade Studio software itself, the functions related to the LED controller are not available in Livegrade 7. If you wish to continue using Novastar's controller with Livegrade Studio for Virtual Production, please continue to use Livegrade Studio 6.5 until the “Virtual Production” module is released.
¶ Integrate Livegrade with COEX
The image above shows the connection between Livegrade and the color grading control system of the COEX range of devices.
As you can see, the only change you need to make for color grading compatibility is to use a computer with the Livegrade Studio software as the control computer. In addition, the Livegrade color grading component built into Unreal Engine 4 is also compatible with the COEX series.
Even if you are accustomed to using the Livegrade component of Unreal Engine 4 rather than the Livegrade Studio software, you can use the COEX control system for color grading without any problems.
(This article will use Livegrade Studio software as a configuration demo)
For structure configuration, you can follow the steps in sections 2.3 Obtain ScreenID, 2.4 Add the Device to the Livegrade Studio, and 2.5 Add Preview Media and Create the Preview Window to add an MX40 Pro/MX2000 Pro/MX6000 Pro to Livegrade Studio.
¶ Obtain ScreenID
Livegrade and COEX series links are mainly through the API, you need to get its ScreenID through the API for the device to connect. Here to MX40 Pro as an example, to demonstrate to get ScreenID.
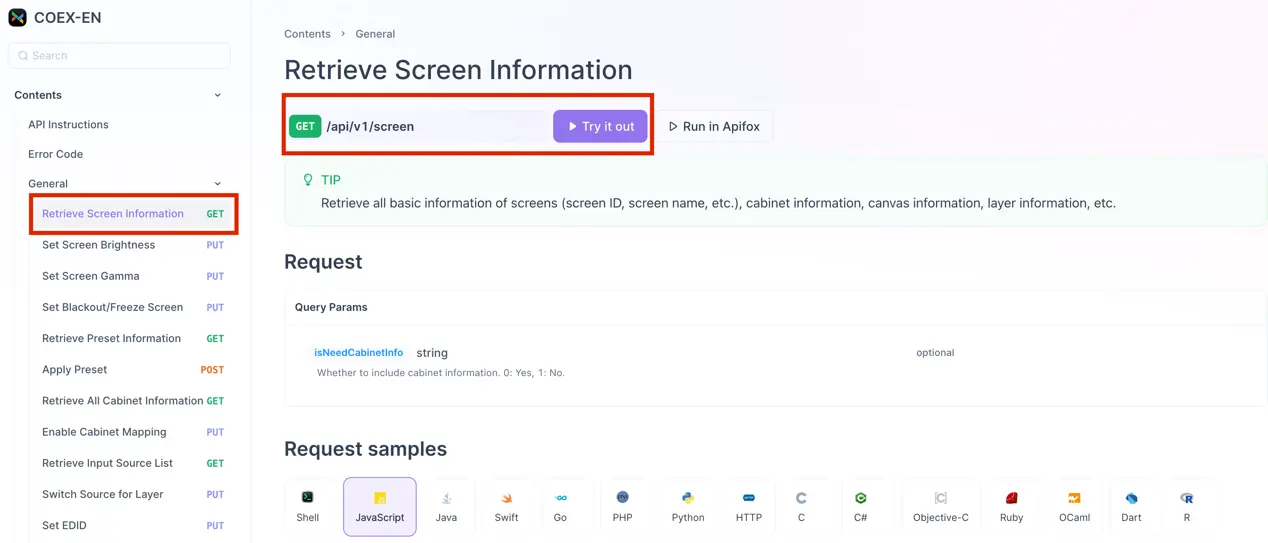
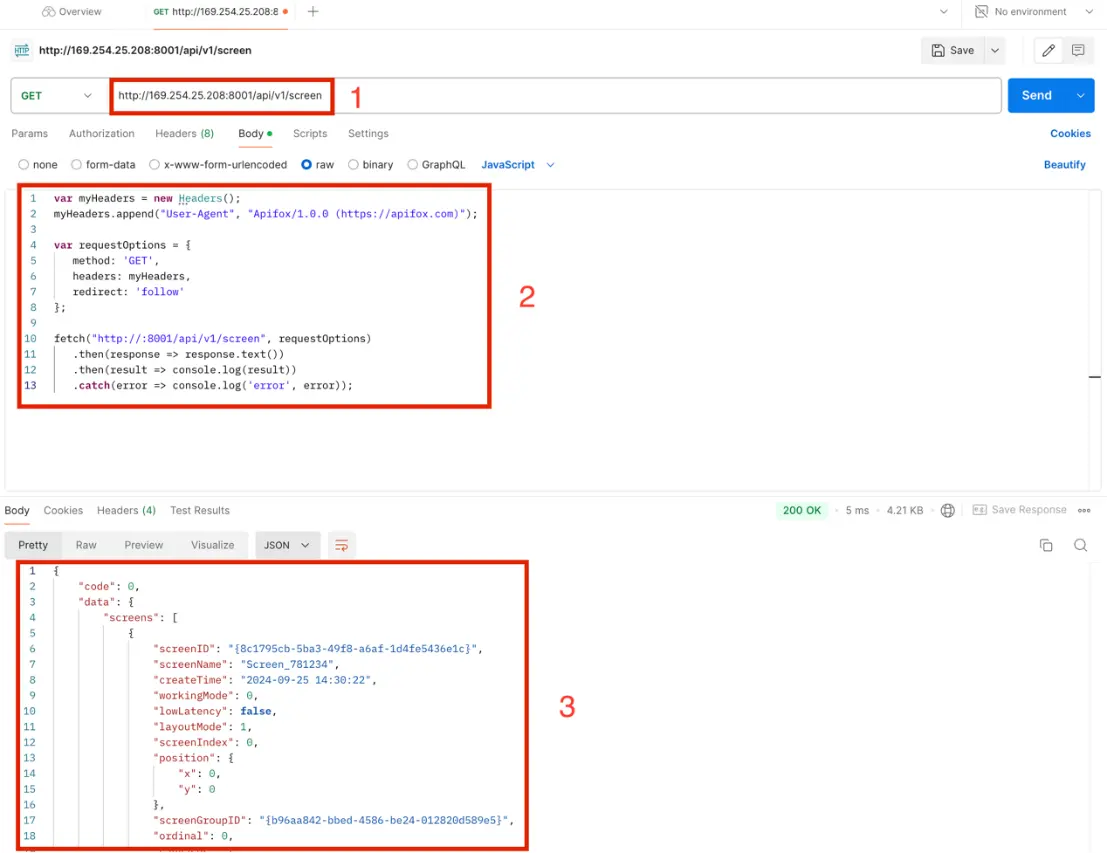
To use the MX40 Pro API to obtain the ScreenID of the LED screen, you can follow these steps using a tool like POSTMAN (or any API testing tool you prefer).
COEX API webpage: Retrieve Screen Information - COEX-EN (novastar.tech)
You will find out there is an option to obtain a screen ID, picture below:
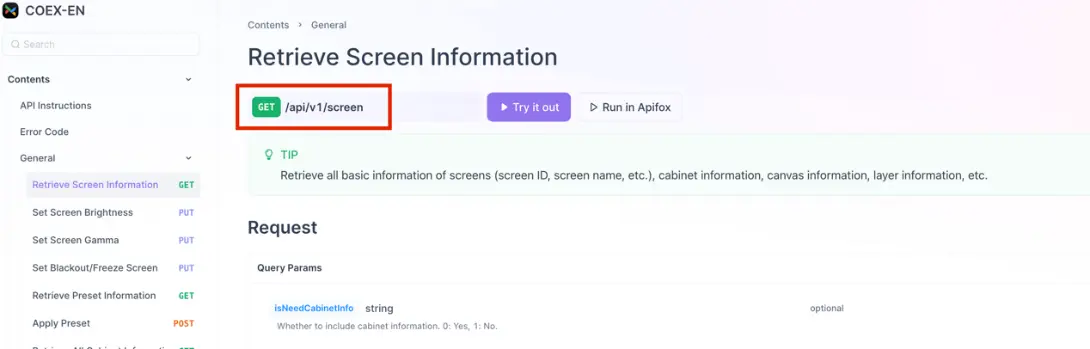
The following interface is an example of how to make an API request call in Postman:

The 1 part in the above picture is the part that needs to be entered and confirmed manually. You can see that the API address is composed of two parts.

The first part of the API address is the device IP, which can be obtained from the LCD screen on the device's front panel. Be sure to append the port number ":8001" to the IP address. As for the API URL, you can find it on the API webpage.
Click the red box on the API webpage in the Figure, the path of the corresponding command can be copied and then pasted into the Postman page with the IP address of the device mentioned above to complete the setting of the communication path.
Note
Different API has different URI. Be sure to copy the correct URI for retrieving screen information.
After completing the first part of the communication path setting, you can start to copy and paste the code snippet into the 2 part of the Postman interface shown in the Figure Example of how to use Postman.
Go back to the API webpage, select a programming language (the screenshot below takes JavaScript as an example), and then click Copy Code in the upper right corner of the code box to finish copying the corresponding code. After you finish copying, enter the interface of Postman software, select the Body part, and paste the copied code snippet.
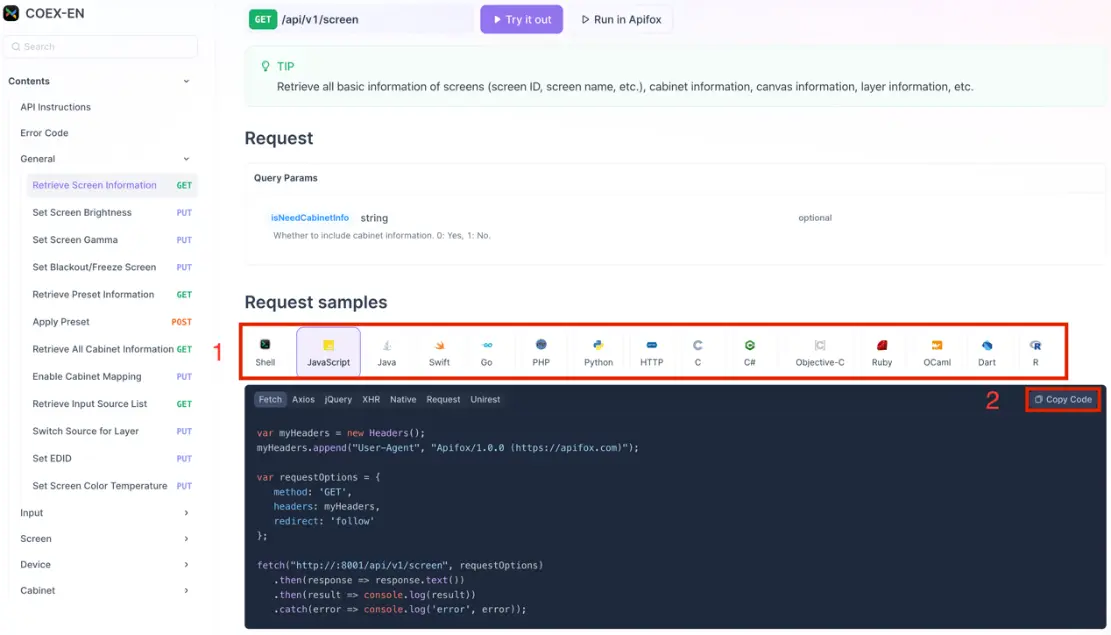
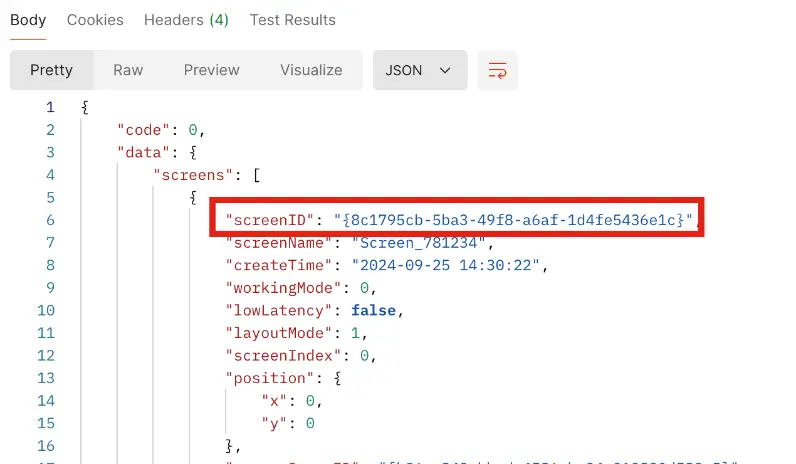
After finishing the above operation, click the Send button on the upper right corner of the Postman interface, you can get the returned screen information in part 3 of the interface, as shown in the Figure Paste code snippet into Postman.
In the API response, you can find the parameter after ScreenID, and then you can go to the next step of configuration.
Note
- If the screen information is not accepted for a long time when obtaining the screen ID, please prioritize checking whether the communication address is correct in the API software.
- Example: http://192.168.0.1:8001/api/v1/screen.
¶ Add Device to Livegrade Studio
- Add MX40 Pro:
Follow the image guide below to add an MX40 Pro.
- Add MX2000 Pro/MX6000 Pro:
Since MX6000 Pro and MX2000 Pro have a modular design, one MX6000 Pro or MX2000 Pro may have multiple screens. In this case, you need to add the ScreenIDs corresponding to all the screens to Livegrade multiple times separately by referring to the method of adding screen IDs for MX40 Pro.
If there is an application scenario where multiple output cards are configured in a single screen, you only need to add one ScreenID in the Livegrade software.
- Configuration demonstration:
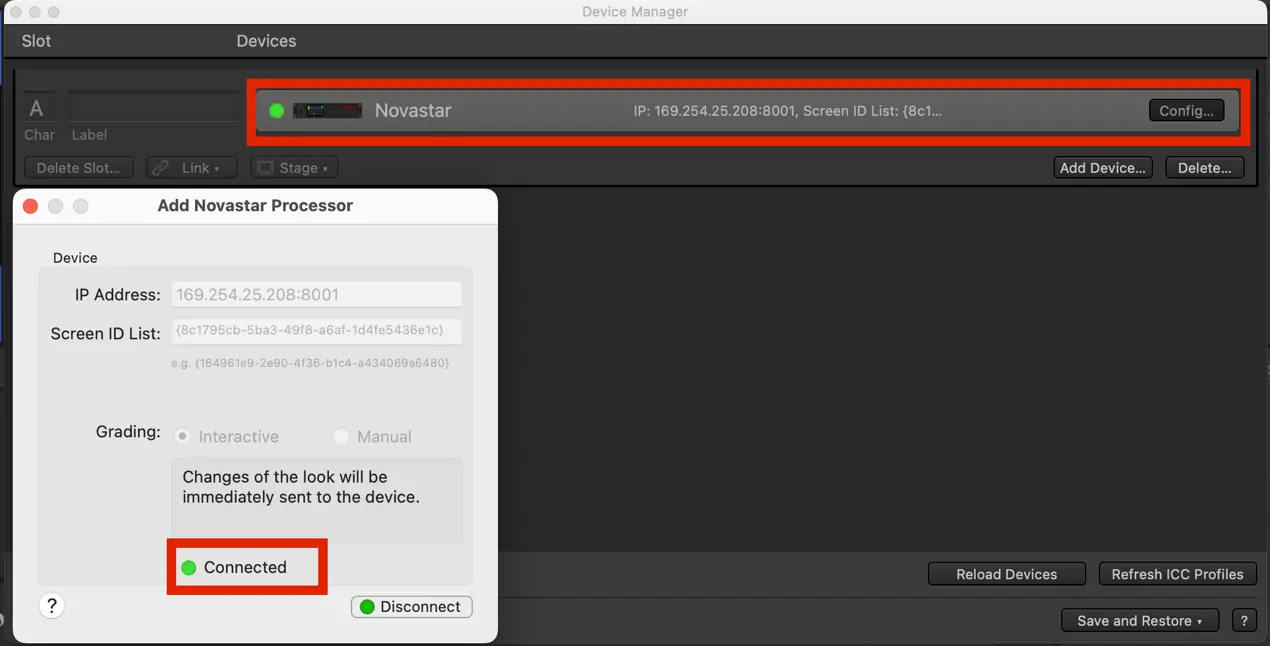
In Livegrade Studio, click the button in order 1, 2, and 3. The window to add a device will appear.
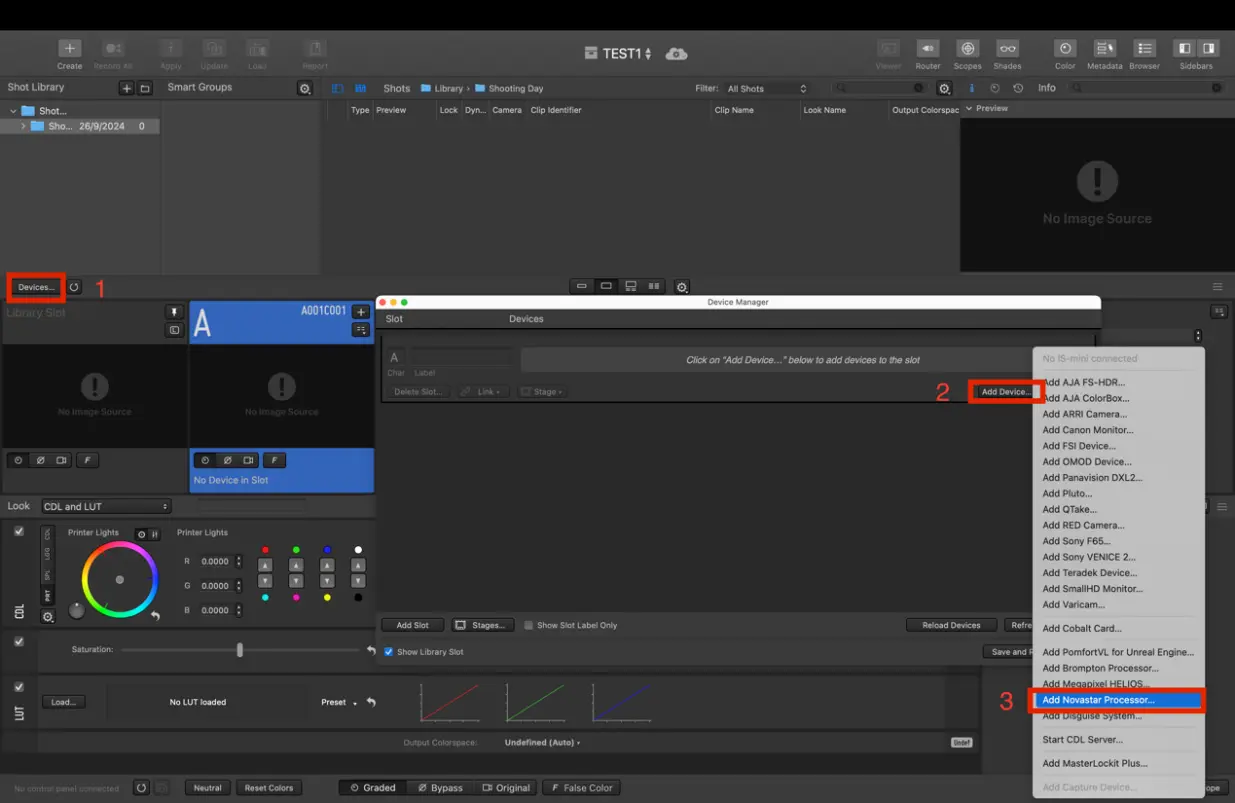
Fill in the IP address of the device in the above format and the screen ID obtained in the above steps into the corresponding position, and then click Connect at the bottom right corner of the window. When the green light turns on and shows that the device is connected, you can proceed to the next step.
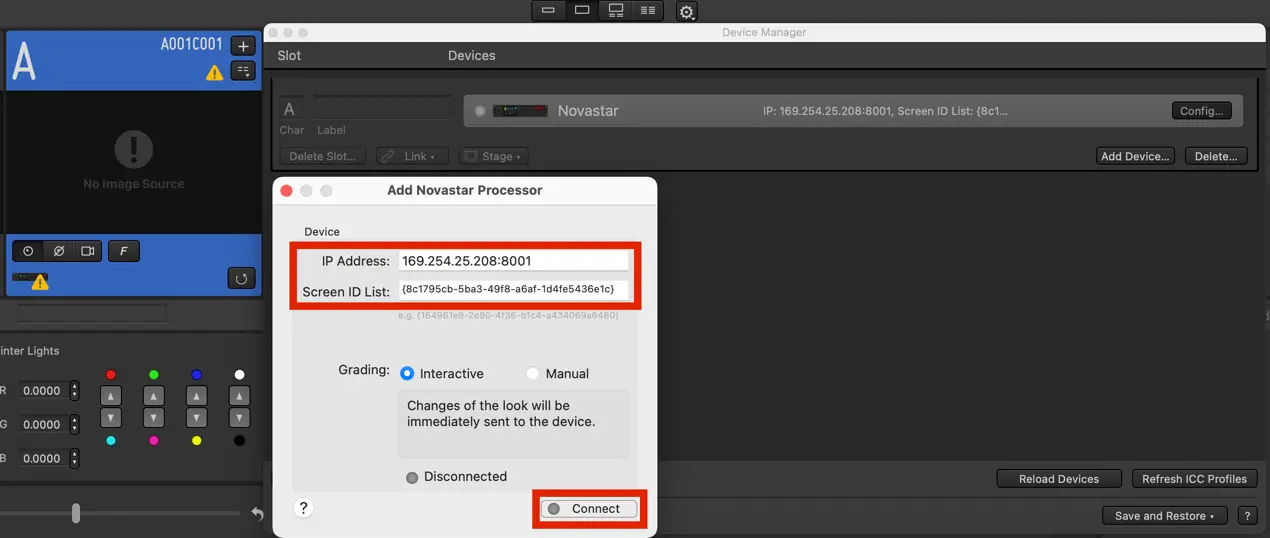
- Enter Device IP Address: Input your device's IP address which can be found in the device front panel. Don't forget to append the port number “:8001”.
- Paste ScreenID: Input Screen ID into the second block, following the format provided in the example.
Note
The screen ID must include “{}”, and always follow the format {00000000-0000-0000-0000-000000000000}. Please make sure to check the correctness of the information on this page according to the format of the information provided.
¶ Add Preview Media and Create the Preview Window
To enable a preview window for easy monitoring of screen status, follow these steps:
Since Livegrade does not have direct access to the source content currently displayed on the LED screen, we need to import an additional media as a reference for 3D LUT adjustment on the Livegrade software.
Click on File at the top and select Import Media... to select the source file you want to use as a color grading preview from the local area.
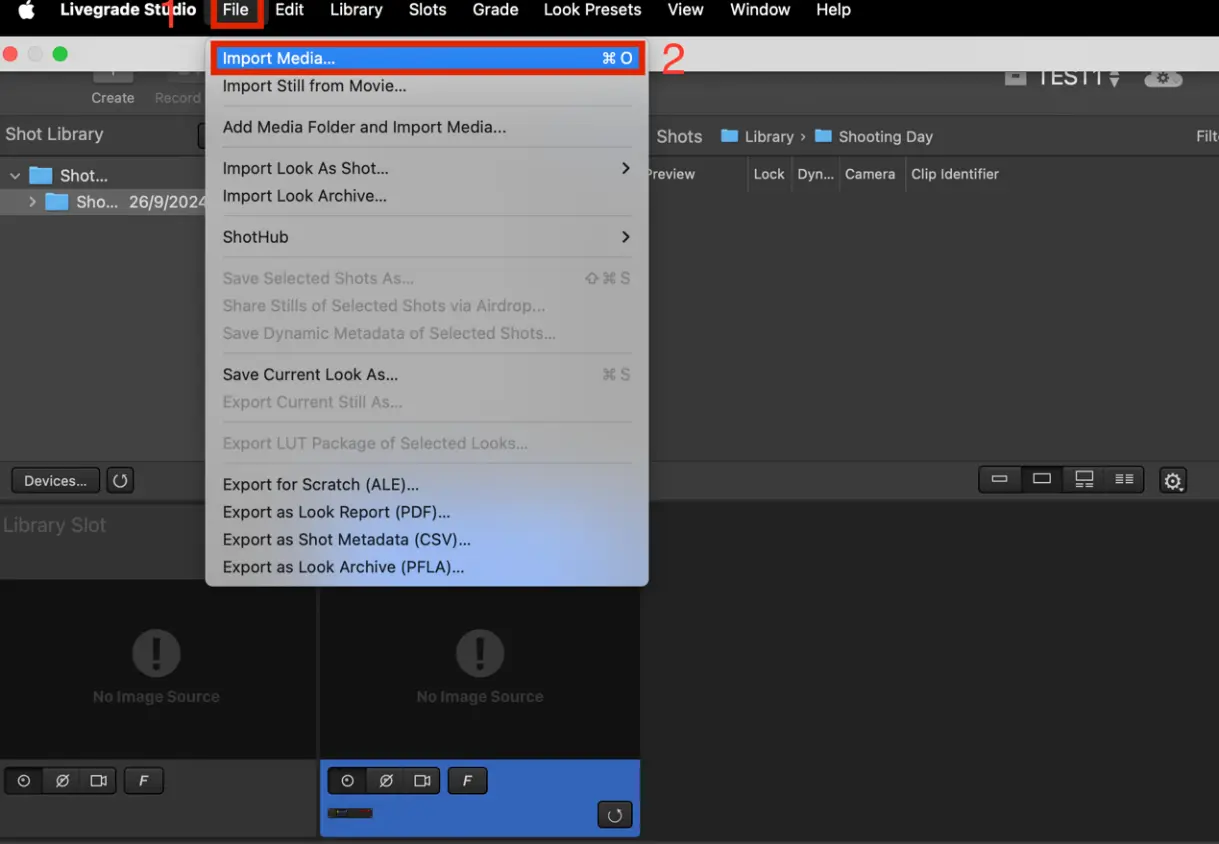

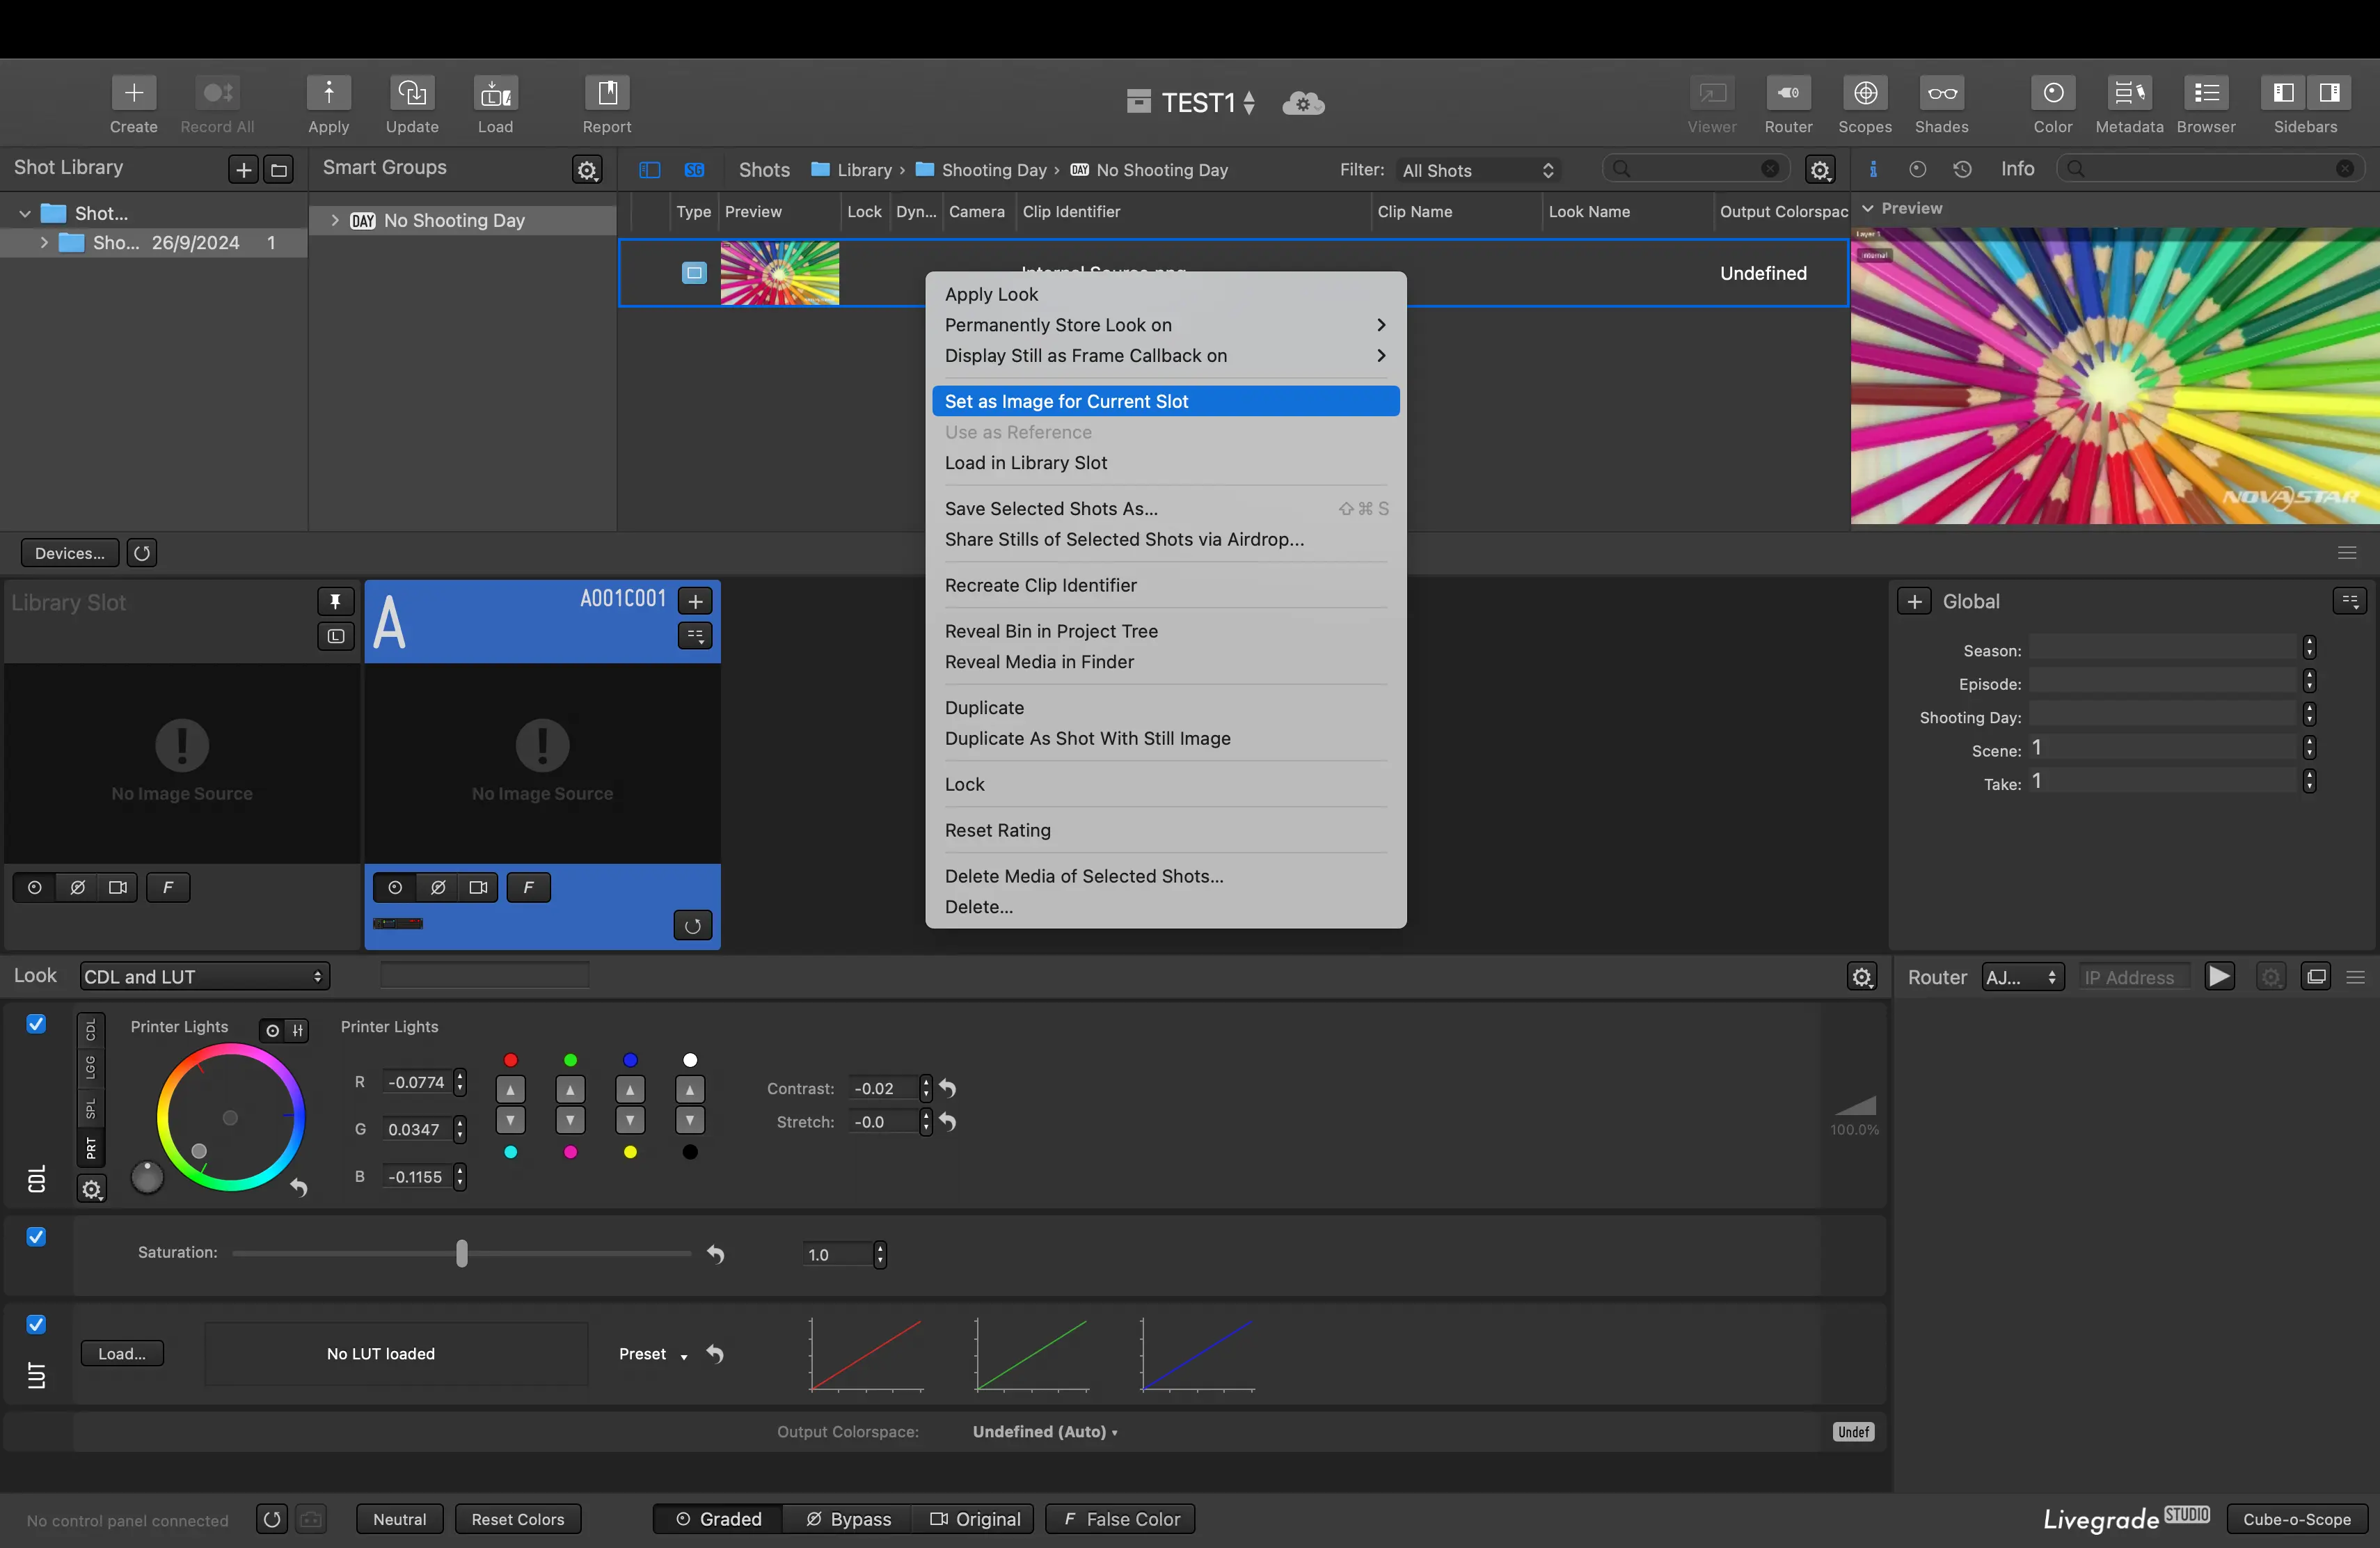
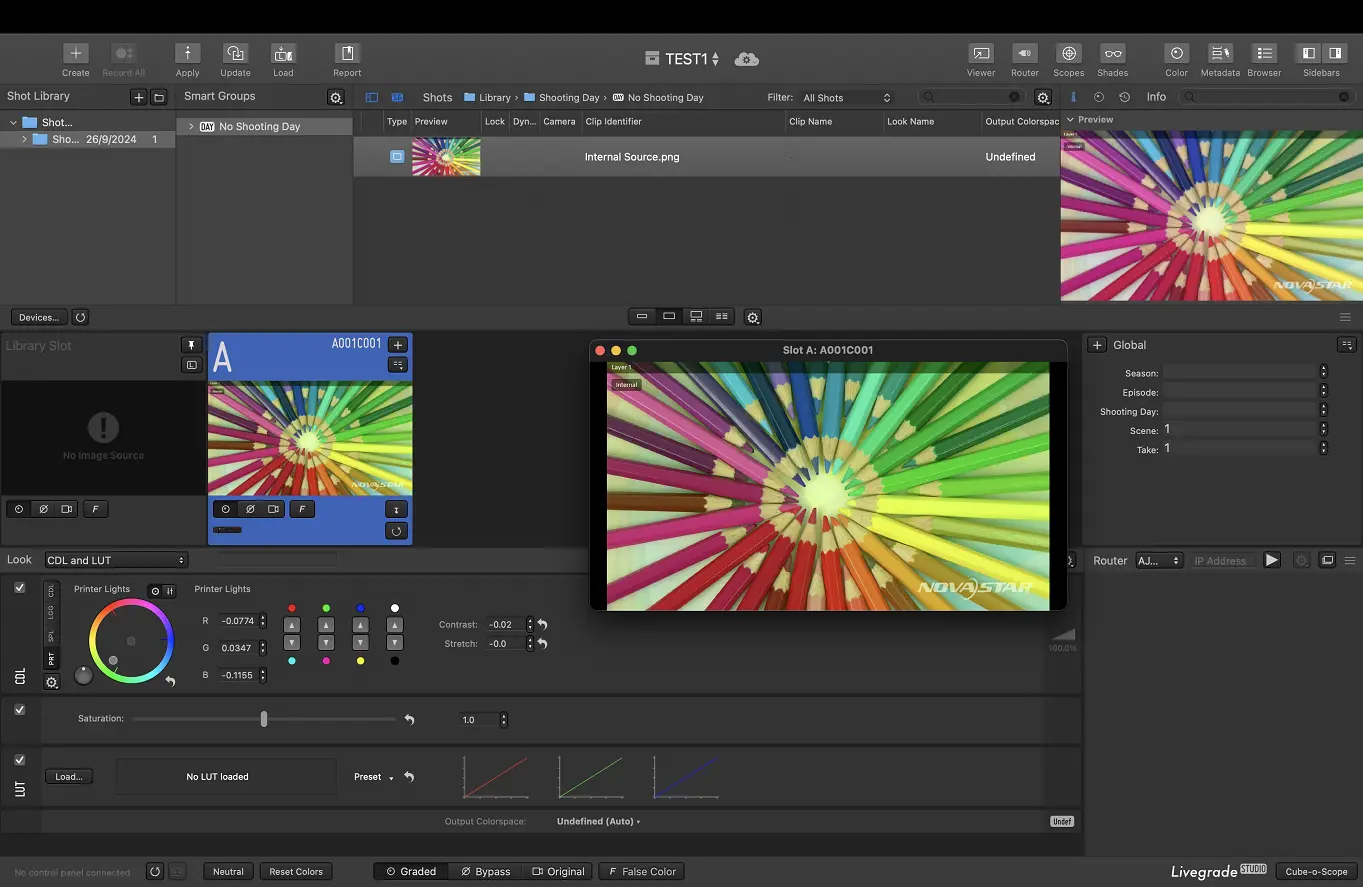
Right-click on the media you just imported in the Livegrade interface and select Set as Image for Current Slot to bring up a preview window where you can observe the color grading in real-time.
We consistently enhance and refine the content of our Wiki articles.
If you find any mistakes or errors, please contact us.
Your continuous feedback and support will help us further improve our products and content.